Azure Security Homelab
A self-built cloud security lab in Microsoft Azure. I've documented the reasoning behind each decision, not just the steps. The goal was to actually understand the "why" behind common security configurations, not just click through a tutorial.
How the pieces connect
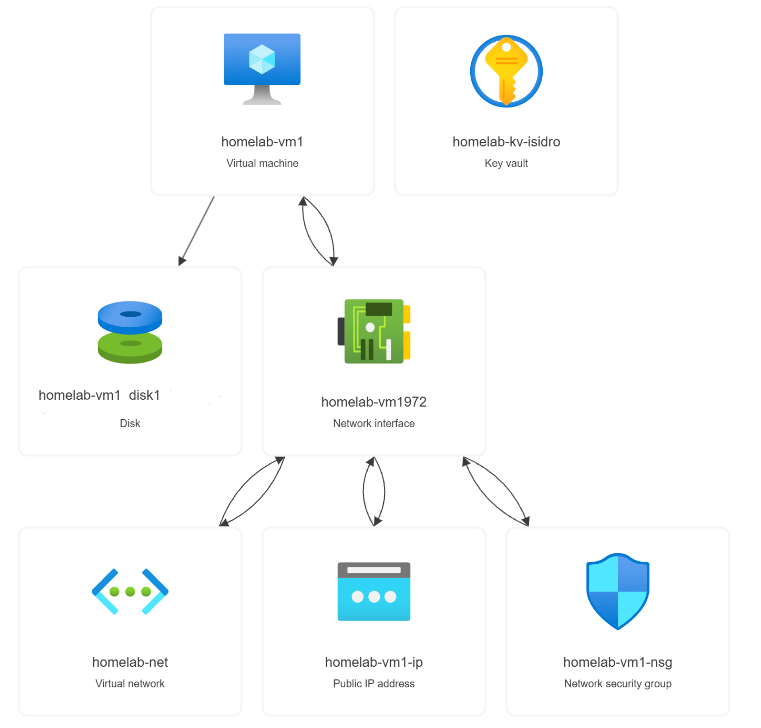
This is the Azure Resource Visualizer view of the lab, showing how everything ties together. The VM sits at the center, connected to its disk and network interface, which in turn connect out to the virtual network, public IP, and network security group. The Key Vault sits alongside it, reachable through the managed identity rather than a direct network path.
What I built
Why this matters
I've seen enough stories of people accidentally racking up huge cloud bills just by leaving a resource running to know that budget alerts should be one of the first things set up, not an afterthought once the invoice shows up.
I set two thresholds instead of just one. The first is a heads-up, a chance to check in on spending before it becomes a problem. The second is more of a "stop and look at this now" signal, giving me a window to shut something down before I actually hit the limit. Waiting for a single alert at the very end doesn't leave much time to react.
It's a small habit, but it's the same discipline that matters in a production environment. The stakes are just a lot higher when it's not your own homelab money on the line.
What I built
Why this matters
Resource groups aren't just folders for keeping things tidy, they're actual lifecycle and permission boundaries. Delete a resource group and everything inside it goes too. Assign a permission at the group level and every resource inside inherits it. Once I understood that, it changed how I thought about organizing things in Azure from the start.
The Virtual Network is what gives the lab its own private network space. Resources inside it talk to each other over private IPs instead of routing out over the public internet, which is the foundation everything else in the lab sits on top of.
I picked West US 2 mostly for practical reasons: lower latency since I'm on the West Coast, solid free-tier availability, and it's one of Azure's better-supported regions in terms of feature coverage.
What I built
Why this matters
Linux runs most of the cloud, plain and simple. Most Azure VMs, containers, and servers you'll actually work with in a job run some flavor of it, so being comfortable in a Linux environment wasn't optional if I wanted this lab to reflect real-world work. This VM ended up being the base that a lot of later phases build on.
I set up SSH key-based auth instead of a password for a pretty simple reason: passwords can be brute-forced, keys can't really be guessed. The private key stays on my machine and never gets sent anywhere, so even if someone found the server, a stolen public key alone gets them nowhere. It's basically the standard now for accessing cloud VMs securely.
Going with a free-tier VM was also intentional. No reason to over-provision compute for a lab like this when a smaller instance does the job just fine.
What I built
Why this matters
Leaving SSH open to the entire internet is one of those mistakes that gets exploited fast. There are bots constantly scanning every public IP address for open port 22, and a fresh VM with wide-open SSH will start seeing login attempts within minutes of going live. Locking it down to just my IP shuts that whole attack surface down.
Adding the explicit RDP deny rule was more about being deliberate than strictly necessary. I don't use RDP on this box at all, but instead of just leaving the port unconfigured, I wanted a rule that spells out "this should never be allowed," so if a default rule ever got added back in by mistake, the deny still wins.
Honestly, NSG hardening is one of those steps that's easy to skip when you're excited to get a VM running, but it's the difference between a server that anyone can poke at and one that only I can reach.
What I built
Why this matters
Entra ID (still catching myself calling it Azure AD sometimes) is really the backbone of the whole environment. Every access decision, who can get to what, what they're allowed to do, what gets logged along the way, comes back to identity in some way. Getting this right early mattered more than almost anything else in the lab.
I made a point of setting up a separate admin account instead of just using my personal Microsoft account for everything. It keeps admin access isolated and auditable, and if my personal account ever got compromised somehow, it wouldn't automatically hand over the keys to the environment.
Verifying the custom domain (itdesklab.com) let me set up accounts under that domain instead of the default onmicrosoft.com one, which makes the whole thing feel a lot more like a real organization instead of a sandbox.
The part I found most interesting was Conditional Access. It's a big shift from the old "are you inside the network, yes or no" mindset. Instead it's asking a bunch of questions at once: who's signing in, from what device, is that device compliant, where are they physically, does the sign-in look risky. Only after weighing all of that does it decide whether to let someone in, require MFA, or block them outright. That's basically Zero Trust in practice, not just as a buzzword.
What I built
Why this matters
Hardcoding credentials into code or config files is one of those things that seems harmless until it isn't. Passwords and API keys end up committed to repos, sitting in logs, or turning up in a breach dump somewhere. Managed identities were the answer here, and once I understood how they worked I couldn't really justify going back to storing a secret in a config file again.
The basic idea is that Azure hands the VM its own identity token automatically. That token is what the VM shows to Key Vault to prove who it is, no password, no API key sitting around, nothing to rotate manually. Azure takes care of the token lifecycle behind the scenes.
What I like about this pattern is that it's not a homelab shortcut, it's genuinely how production applications are supposed to handle secrets. Pull them at runtime using an identity Azure manages, instead of baking anything sensitive into the app itself.
What I built
Why this matters
Security isn't something you set up once and forget about, it needs to be checked on continuously. Defender for Cloud gives a live view of how the whole environment is holding up against Microsoft's security benchmarks, which is exactly the kind of ongoing visibility a static one-time setup can't provide.
The Secure Score ended up being more useful than I expected. It takes a messy pile of individual security controls and turns them into one number you can actually track over time. That's not just a nice-to-have, it's how real security teams show progress to leadership and make the case for further investment. Higher score generally means fewer gaps for something to slip through.
Going through the recommendations one by one taught me more than I anticipated. Each one comes with an explanation of why it matters, and because it's tied to my own actual resources instead of a generic tutorial, it stuck a lot better than reading about it in the abstract.
What I built
Why this matters
Without a SIEM, security events end up scattered across a dozen different places. You might have logs sitting in one service and alerts in another, with no easy way to connect the dots. A SIEM pulls all of that into one place so patterns actually become visible: the same account failing to log in a bunch of times in a row, a sign-in from a country nobody on the team has ever traveled to, that kind of thing.
I went with Sentinel because it's cloud-native, so there's no infrastructure to manage on my end and it scales on its own. Once I connected the Entra ID sign-in connector, every login attempt, successful, failed, MFA challenges, all of it, started flowing into the Log Analytics workspace where I can actually query it.
This is really just the foundation, though. The connector gets the data flowing in, but the real value comes later when you start building detection rules on top of it, things like flagging an account that fails ten logins in five minutes. Getting the data pipeline right first is what makes that possible down the line.
Cloud-native SIEMs are also where the industry seems to be heading in general, so getting hands-on with Sentinel felt worth prioritizing over something more traditional.
Hybrid Cloud + Proxmox Homelab
Right now I'm working on connecting this Azure environment to a friend's on-premises Proxmox setup over a WireGuard VPN tunnel, basically turning this into a real hybrid cloud environment instead of something that only lives in Azure.
WireGuard VPN Tunnel
A site-to-site VPN linking Azure to the on-prem Proxmox environment over an encrypted tunnel. I went with WireGuard over something like IPSec mainly because it's simpler to configure and the performance is noticeably better.
Cross-Network Identity
Extending Entra ID identity across both sides, so a user authenticated in Entra ID can reach resources on either side of the tunnel instead of dealing with two separate identity systems.
Firewall & NSG Rules
Coordinating rules on both ends, NSGs controlling traffic on the Azure side, paired with firewall rules on the Proxmox side, so security is enforced consistently no matter which direction traffic is moving.
Azure Arc
Using Azure Arc to bring the on-prem Proxmox VMs into the Azure portal so they can be managed and monitored the same way as anything actually running in Azure.
Why this phase matters
Almost no company is running 100% in the cloud, hybrid environments are just the reality most security teams deal with. Understanding only Azure, or only on-prem, leaves a gap. This phase is my attempt to close that gap myself: connecting two different environments, extending identity across both, and keeping security consistent on either side of the tunnel. It's the kind of setup that maps directly onto what hybrid cloud roles actually look like.